
In this Article…
- Setting up and Running FDS – Quick start video
- Run the FDS demo program
- Running Smokeview – using the launcher
- Troubleshooting
- Other Topics and Tips – downloading results
- Performance considerations
- Tools – fdsreader
Setting up and Running Fire Dynamic Simulator (FDS)
Before reading this section, you should already have an understanding of how to transfer files.
Quick Start Video:
Log into your account. Select “Tools –> Remote Desktop” (or “Plugins –> Remote Graphics”).
Use the file manager to create a project folder/directory. The File manager is located on the tool bar of the desktop. Be sure not to include any spaces in the folder name.

Copy your fds file from your PC to the directory you just created using the ssClient’s SFTP tool (Tools –> File Transfer).
From the Sabalcore icon located at the bottom of the Graphical Interface, select “FDS”.

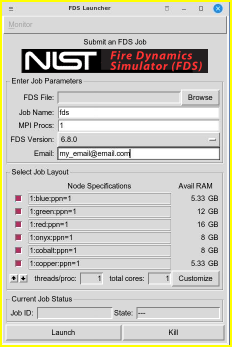
The launcher will display.
MPI
MPI is most efficient/best performance and is the default method.
-
-
- Select your fds file.
- Job Name: A default name is entered automatically, or enter your own.
- MPI Procs: The number of MPI Processes. The launcher will read the .fds file and automatically fill in this value. It will assign 1 core per mesh (most efficient/best performance) by default or assign processor cores based on what is defined in the .fds file. If you have a special case, please contact support for the recommended settings.
- Select the version of FDS you’d like to use. The newest is the default. It is best to match the version you have on your PC with.
- Enter an email address (or addresses) you’d like system information about this job to be emailed. Multiple comma separated email address can be entered.
- Choose which cluster you’d like to use. By default, all clusters are selected which means the system will run the job using nodes from the first available cluster starting with “blue” and working downward. Uncheck the cluster(s) which you do not want the job to run on.
- Threads per process (optional): Default is 1 thread per core per mesh (i.e. 1 processor core per mesh) which is the most efficient and the recommended setting. Adding more process threads per mesh will increase the number of processor cores and reduce wall-time. See “Performance Considerations”
-

- It is recommended to close and restart the launcher if you need to load a different fds file.
OpenMP (aka desktop PC)
OpenMP utilizes all CPUs on a single node regardless of how many mesh are defined. It is the lest processor efficient method for most cases. This is often the default method used when running jobs through Pyrosim on a desktop PC or when using other cloud services. To run using only OpenMP (to utilize N CPU cores on a single node) follow these steps:
-
-
- Select your fds file.
- Job Name: A default name is entered automatically, or enter your own.
- Number of MPI Processes: manually set this value to “1”.
- Select the version of FDS you’d like to use. It is best to match the version you have on your PC with.
- Enter an email address (or addresses) you’d like system information about this job to be emailed. Multiple comma separated email address can be entered.
- Choose which cluster you’d like to use. By default, all clusters are selected which means the system will run the job using a node from the first available cluster. Uncheck the cluster(s) which you do not want the job to run on.
- Threads/process (required): Increase this to the desired number of cores. The maximum number of cores that can be assigned correlates to the total cores of a single compute node. See “Performance Considerations” for more details.
-
Now, select “Launch”. A copy of the pbs file is displayed for verification. It is possible to edit the pbs file in this window but is generally not necessary.

Finally, select “Submit Job” to submit the job now (or select “Cancel” to go back to the Launcher).
Your job is assigned a job ID. The job’s State will change from “queued” to “Running”.
“Kill” will kill the job
- It is recommended to close and restart the launcher if you need to load a different fds file.
Monitor the running Job
By default, the job state log will open after the job starts. Or you can open the log using “Monitor” at the top left of the Launcher.

The name of the cluster the job is running on is at the top of the window.

You can also access all the files from the file manager. Open the file manager and navigate to the working folder to access the output files and smokeview file.
You may need to select “Reload” the file manager to refresh the file listing.
For additional help please contact your Sabalcore representative or Sabalcore Support. We’d be happy to schedule an interactive session where we share your screen and walk you through the processes.
Running Smokeview – Using the Launcher
At the bottom of the Remote Graphics screen select Smokeview from the menu.

You will see the Smokeview launcher appear:

The default Node Spec should be adequate for most situations. But for optimal visual performance select “Enable Accelerated 3D-Grpahics Support”. This will allow Smokeview to run on a graphics node using hardware acceleration (i.e. a graphics card).
Browse to your smokeview file (located in the working directory) and click start. After a few moments Smokeview should appear.
Troubleshooting
Smokeview fails to run
Occasionally an issue arises related to the window manager and Smokeview. You may see an error in the Smokeview.e.* or smokeview.o.* job log file related to VGL. It may look something like this:
[VGL] ERROR: Could not connect to VGL client. Make sure that vglclient is
[VGL] running and that either the DISPLAY or VGL_CLIENT environment
[VGL] variable points to the machine on which vglclient is running.
[VGL] ERROR: in connect--
[VGL] 282: Connection refused
The solution is to run the following command in a terminal in your Sabalcore desktop. Open a terminal or xterm and enter this command:
vglclient -detach -force
Then try running Smokeview again.
Other Topics and Tips
File and Folder Names
When copying files and folders from a Windows PC to your Sabalcore account, keep in mind Linux does not play well with names with blank spaces ” “. Prior to copying, rename the files and folders without spaces.
Transferring your results
We highly recommend using GFT to transfer results. GFT is designed to transfer very large files. You will need to zip the FDS directory into an archive and then transfer the archive using GFT. Complete details and instructions for GFT can be found here. Other options for transferring files can be found here.
Exporting from Pyrosim
Some items to consider when exporting from Pyrosim…
- FDS requires a .fds file. Be sure to export as .fds and not .psm
- When Pyrosim exports a .fds file it sometimes creates other files which contain surface textures and other visualization data. These files have to be in the same folder as the .smv file in order for those outputs to be visible in Smokeview.
Performance Considerations
There are many factors that can affect how well a model performs. There are many factors to consider when optimizing model runs. The user should experiment with various configurations to find the optimal performance for their particular models. Official information can be found in the FDS user manuals. We summarized some important points here as related to running FDS at Sabalcore:
- As of FDS 6.2.0 most of the parallelization effort has been focused on the divergence, velocity and radiation modules. It has also been limited to the default solvers and common settings. This means that your speedup will vary depending on your simulations settings and settings such as isosurfaces and DNS simulations will experience smaller speedups.
- The number of process threads and the degree in which a model can be parallelized is determined by the number of meshes and cell count in a model. So larger simulations will see a greater speedup relative to smaller ones.
- FDS supports 3 “modes” of parallelization – MPI, OpenMP, and MPI_OpenMP.
- The default mode at Sabalcore is MPI. MPI is the most efficient and provides the greatest performance benefit vs cost ($). For example, a model with 20 meshes and 1M cells will run faster using MPI process threads than the same model with 1 mesh and 1M cells using 20 OpenMP process threads.
- MPI and MPI_OpenMP support 1 or more nodes. OpenMP is restricted to one compute node.
- At Sabalcore, a single CPU core is allocated to one FDS process thread whether it be a MPI or OpenMP thread.
- Using one processes thread per mesh (MPI) is the most efficient use of the processor. Using two or more threads per mesh (MPI_OpenMP) will generally reduce wall-time of the simulation but at the expense of processor efficiency and will have a higher cost $. For example, you can expect 4 MPI processes to speed up the computation time by a factor of about 0.9 times 4. The OpenMP can provide an extra factor up to about 2, regardless of the number of cores used beyond about 4.
- Generally, up to 4 process threads per mesh will provide speed improvement (but not linear) when using MPI_OpenMP. Adding too many threads per mesh (overloading) may cause poor performance, particularly if the number of cells per mesh is too small relative to the overall size of the model.
- If a model contains only one mesh, you must use OpenMP for parallelization. There is a limit to the benefit that OpenMP can provide. Between process loops there are lines of code that can not be multi-threaded and must run single thread. Before and after each loop with an OpenMP directive there is cost in starting and stopping threads for that loop. This impacts performance and efficiency. For example, a single mesh model running 4 OpenMP threads will cost ($) approximately 2-3 times as much as the same model split into 4 meshes and using MPI.
- You must manually modify the FDS launcher settings if using OpenMP. See above paragraph “OpenMP” or contact Support if you need assistance.
Tools
fdsreader – A fast and easy-to-use Python reader for FDS data. fdsreader documentation
First, you’ll need to start an interactive (or batch) job to install fdsreader in your account. See the python article for more details. Here is a summary:
First start an interactive job:
qsub -I -l nodes=1:ppn=2
Next, load the python module:
module load python
Use pip to install the setup tools first. Be sure to include “-U” option so it is installed in your account.
pip install -U --user setuptools
Lastly, install the fdsreader package. You may want to use the ‘–no-deps’ option.
pip install -U –user fdsreader
Now that it is installed, you may invoke it for an interactive or batch job by first loading the python module, “module load python”