
Cores, Compute Nodes, Clusters, and other Resources
Terminology
ssClient, Client, Login Client – The application you downloaded and installed. Sometimes referred as “ssClient”, client, or login client. This is were you enter commands, transfer files, and launch and access the remote desktop.
Job – A user’s work load or process; what the user wants to run, process, simulate.
Core – A “core” is one physical processor of a CPU. A CPU core is a CPU’s processor. A CPU has many cores. You can think of a core as a single processor. For example, if you need “32 processors” for a job, you need 32 cores.
CPU – A CPU contains many processor cores.
Compute node – A “compute node” (also referred to as ‘node’) is a server with 2 CPUs, memory, local storage, networked storage, and a high performance network connection to other compute nodes in the cluster. Jobs run on one or more compute nodes.
Cluster – Compute nodes of similar configuration are organized into “clusters”. Each cluster has a name to easily identify it. For example, these are names of some of the clusters: “blue”, “copper”, “red”.
Terminal – A terminal accepts command line inputs (ie CLI). The terminal is also available in the remote graphics (i.e. remote desktop). The ssClient/ login client is also a in fact a terminal. You can enter any command-line command at the prompt in the client.

What processors, compute nodes, and clusters are available?
When a job is submitted for processing, it is placed in a queue. The job will start on the first available node directive specified by the job parameters. Regardless of how busy a particular cluster is, the job will start when the resources become available.
upnodes – The “upnodes” command gives a quick and simple overview table of the clusters and their compute node configurations (and current status) . The cluster name (which you will need to use to specify cores), processor type, RAM, and total number of nodes and cores in the cluster are displayed in the table. Use this information to help determine your job’s node directive described in artical 4 “Setting up your Job” of this section or if you are using a launcher to select your cores.
Try this –> In any terminal, enter the command “upnodes” at the prompt.
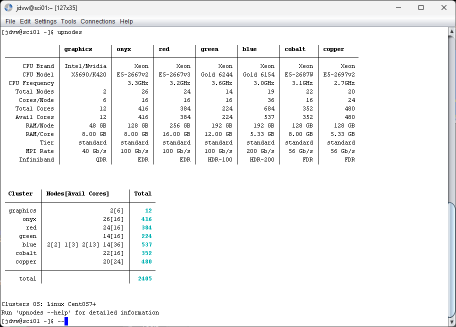
Upper Section – In the first section of the output, the first row of the table contains the “cluster” names. The column beneath the cluster name are the cluster details.
- CPU Brand: the brand of the CPU – Xeon
- CPU Model: the model of the CPU
- Clock Frequency: The base clock Speed of the CPUs in GHz
- Total Nodes: Total nodes in the cluster
- Cores/Node: The physical cores per node
- Total Cores: The total number of physical cores in the cluster
- Avail Cores: The total number of cores currently unoccupied. Some unoccupied cores maybe reserved for jobs ahead of your job in the queue. See the second section below to determine what cores are currently available to you.
- RAM/Node: The amount of physical RAM per node
- RAM/Core: The amount of physical RAM per core. Your application is not allowed to exceed this amount.
- Tier: The pricing tier of the cluster
- MPI Rate: The MPI Infiniband network speed in Gigabits per second
- Infiniband: The Infiniband network performance architecture
Lower Section – In the second section of the output the number of nodes with corresponding unoccupied cores that are available for your new job (or the first job you currently have in the queue based on it’s first nodes directive) is shown. Use these values to determine when your job may start. Regardless of how busy a particular cluster is, the job will start when the resources become available.
Cluster | Nodes[Avail Cores]
For example, for the copper cluster ” 4[0] 14[10] 16[24]” is interpreted as 4 nodes with [0] unoccupied cores, 14 with [10] unoccupied cores, and 16 nodes with [24] unoccupied cores are available for your job at this moment. Submitting a job requesting 10 nodes with 24 cores each would likely start immediately. NOTE: You do not have to wait for cores or nodes to be free before submitting a job. Submit the job and it will automatically start as soon as resources become available.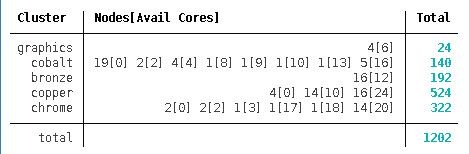
- Important items about this section
- Your first job will start immediately (or within a few minutes after the node boots from sleep mode) if at least one of your nodes directives is met.
- You do not have to wait for the cores to be available for you to submit a job. You can submit any job and it will start as soon as the cores are available.
- If a job is queued (not running but waiting in the queue), the output is based on the first nodes directive defined in the job script (or first one defined in a launcher).
Now let’s move to Article #3 “Usage and Account Balance”